Ultimate Guide to Voice Recording Microphones: USB, XLR & Shotgun Picks 2025
Ever spent hours tweaking your microphone settings, only to realize your voice sounds like it’s coming through a tin can? I remember the exact moment I hit that wall. I was trying to record a simple podcast, confident I could get away with a cheap USB mic. Instead, I got muffled sound and endless frustration. It was a lightbulb moment. I needed the right microphone, not just any gear at hand. That realization set me on a journey, and I want to save you the hassle of trial and error.
Why Choosing the Right Microphone Can Make or Break Your Voice Recordings
Picking the perfect microphone isn’t just about fancy tech. It’s about clarity, warmth, and getting your voice to sound natural and engaging. Whether you’re podcasting, streaming, or creating content, your microphone becomes your voice’s best friend or worst enemy. The good news? There are top-tier options in every category—USB, XLR, and shotgun—that can dramatically improve your sound quality in 2025. I’ll walk you through what works now and how to avoid common pitfalls.
Is Investing in a High-End Microphone Really Worth It?
Honestly, I used to think I could get away with cheap gear. Until I learned the hard way that a poor microphone setup can undermine even the most talented voice. Early on, I made the mistake of choosing a mic based solely on price, ignoring sound quality and compatibility. That’s a mistake I see many creators repeat. The truth? Spending a little more on the right mic pays off in professional sound and fewer headaches. For a comprehensive look at the best options, check out the ultimate guide to XLR microphones and the top XLR picks for creators.
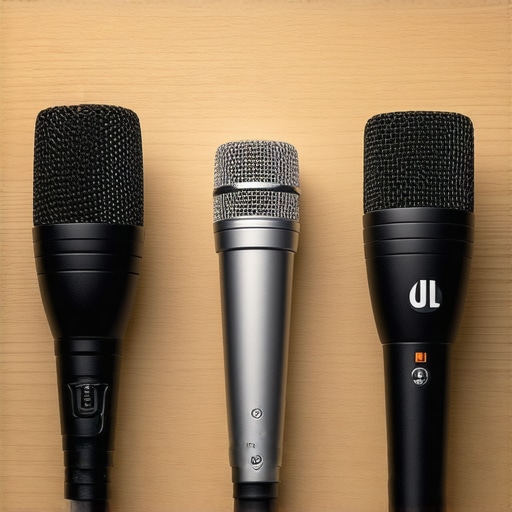
Select the Right Microphone for Your Setup
Start by defining your primary use—podcasting, streaming, or professional voice work. For beginners, a USB microphone is often sufficient, offering plug-and-play simplicity. If you need higher quality and flexibility, explore XLR microphones, which require an audio interface but provide superior sound.
Assess Your Environment and Microphone Compatibility
Consider your recording space. Is it echoey or treated? For untreated rooms, a shotgun mic can focus on your voice and minimize background noise. For voice recording in noisy environments, a shotgun or dynamic mic might be best. Ensure your chosen microphone is compatible with your setup—USB mics connect directly, while XLR mics need an audio interface.
Test and Fine-Tune Microphone Positioning
Position is key. I once spent hours setting up a condenser mic only to realize that placing it too close caused harsh sibilance. Experiment by placing the mic about 6-12 inches from your mouth, slightly off-axis to reduce plosives. Use a pop filter—something as simple as a foam windscreen—to improve clarity. Record test clips to compare placement and find the sweet spot for your voice.
Optimize Settings and Use Proper Accessories
Adjust gain levels to avoid peaking—clipping will ruin your audio. Use a quality microphone stand or boom arm to keep the mic steady and reduce handling noise. Consider adding acoustic treatment like foam panels or diffusers to your room to enhance sound quality further. For detailed advice, check out the ultimate guide to microphone setup.
Evaluate and Upgrade Based on Feedback
Once you’ve set everything up, listen critically. Record yourself in different scenarios—reading, singing, or speaking naturally. Use headphones to catch issues like background noise or sibilance. If needed, upgrade components or reposition your microphone. Remember, the best mic is the one that brings out your voice clearly and naturally, fitting your environment and budget.
Many creators fall into traps when selecting and setting up their microphones, often based on misconceptions that hinder their audio quality. Let’s dig deeper into some of the most common myths about microphones and reveal the hidden nuances that can elevate your recordings to professional levels.
Are Higher Price Tags Always Better?
It’s a widespread belief that spending more guarantees superior sound. While high-end microphones like those discussed in the ultimate guide to XLR microphones can offer exceptional clarity, the truth is that your setup, environment, and technique matter just as much. Many creators overlook affordable yet capable microphones, such as certain USB models, which can deliver excellent results when paired with proper positioning and acoustic treatment. Don’t assume that a high price is a guarantee of quality—evaluate features, compatibility, and your specific needs instead.
The Myth of the Perfect Microphone Setup
There’s a misconception that once you’ve chosen your mic, you’re set. In reality, microphone placement, gain settings, and room acoustics play critical roles. For example, a common mistake is placing the mic too close, which can cause harsh sibilance and plosives, or too far, leading to background noise. Experimentation is key. I recommend recording multiple test clips, adjusting position and settings, and listening critically. For advanced tips, check out the ultimate guide to microphone setup.
Is a Dynamic Microphone Always Better for Noisy Environments?
Many believe that dynamic microphones are inherently better for noisy settings. While they do excel at rejecting background noise due to their cardioid patterns, this is not the full story. Condenser microphones can also perform well in treated spaces or with proper directional accessories like shotgun mics. The real secret is understanding your environment and choosing the right microphone type accordingly. For instance, a shotgun mic can focus on your voice while minimizing room echo, but it requires precise positioning. Exploring the best shotgun microphones can help you find the perfect match for your setup.
Have you ever fallen into this trap? Let me know in the comments. Remember, mastering your microphone setup involves understanding these nuances, not just buying the priciest gear. For tailored advice, check out our comprehensive guides and reviews linked throughout this post.
Keeping your microphone setup in top shape isn’t a one-and-done task; it requires ongoing maintenance and the right tools. Over time, dust, humidity, and regular usage can degrade audio quality or even damage delicate components. That’s why I recommend establishing a routine with specific tools and practices to ensure your gear continues to perform at its best.
How do I maintain my microphone and setup over time?
First, regularly clean your microphone using a soft, lint-free cloth. For XLR microphones, avoid harsh chemicals; instead, use a slightly damp cloth to wipe the grille and body. If you notice dust or debris inside the grille, a gentle blow with compressed air — like the recommended cleaning techniques in the ultimate guide — can help keep it clear without damaging internal components.
Next, invest in a quality pop filter or windscreen. These accessories not only improve sound clarity but also protect your microphone from saliva and moisture that can accumulate over time. I personally use a metal mesh pop filter because it’s durable and easy to clean, ensuring consistent performance during long recording sessions.
Monitoring equipment is equally important. A pair of high-quality headphones, like the favorites from our top picks, helps you catch issues early—background noise, sibilance, or clipping—so you can adjust in real time rather than after recording. Regularly inspecting your cables and connectors for wear and tear is crucial, as faulty connections are a common culprit of inconsistent audio quality.
Tools I recommend for long-term microphone care
For routine cleaning, a can of compressed air is indispensable. It’s perfect for removing dust from grills and internal components without risking damage. For more thorough cleaning, I use a mild isopropyl alcohol solution on a microfiber cloth, which effectively removes oils and dirt without harming the finish.
In terms of software, I rely on DAWs like Reaper or Audacity to monitor levels and identify issues like background hum or distortion. Using spectral analysis tools—such as those built into Adobe Audition—helps me visualize audio problems and address them before publishing.
Looking ahead, I believe the trend in microphone maintenance will lean toward smart sensors embedded within gear, providing real-time diagnostics and alerts. This will make proactive upkeep easier and more precise, reducing downtime and prolonging the lifespan of your equipment.
If you want to get serious about your setup’s longevity, try integrating a simple routine with these tools and practices. Regular checks and cleanings can save you money and frustration in the long run, ensuring your voice remains clear and professional for every project.
What I Wish I Knew About Microphone Mastery Before Starting
- My biggest lightbulb moment was realizing that the environment can make or break your mic choice. A great microphone in a noisy room still sounds bad—so don’t overlook room treatment.
- Choosing a mic based solely on price is a trap. I learned that even affordable models, when used correctly, can outperform expensive gear in real-world scenarios.
- Microphone placement isn’t just about proximity. Small tweaks in angle and height dramatically improve clarity. Recording test clips helped me find the perfect spot.
- The myth that higher price equals better sound? Not true. It’s all about matching your needs with the right features and setup.
- Ongoing maintenance, like regular cleaning and proper storage, preserves your gear’s performance for years to come. A little effort keeps your voice sounding professional.
Tools and Resources I Trust for Better Voice Recording
- Ultimate Guide to XLR Microphones: It’s my go-to for understanding which professional mics suit my needs and how to set them up properly. The detailed comparisons save me hours of research.
- Top XLR Voice Recording Microphones for Creators in 2025: This list keeps me updated with the latest models that deliver studio-quality sound without breaking the bank.
- Best USB Shotgun Microphones for Voice Recording in 2025: Perfect for quick setups and on-the-go recording. I trust these reviews because they test real-world scenarios.
- Ultimate Guide to Voice Recording Microphone Setup: It’s invaluable for troubleshooting and fine-tuning my setup to avoid common pitfalls.
Time to Elevate Your Voice and Make an Impact
Remember, the microphone is your voice’s best friend—when chosen and maintained correctly, it can elevate your content and connect more deeply with your audience. Don’t settle for less; invest the time to learn and refine your setup in 2025. Your voice deserves it, and your listeners will thank you for the clarity and warmth you bring to every word.
What’s the biggest challenge you face when setting up your microphone? Share your experience below—let’s grow together!
6 responses to “Ultimate Guide to Voice Recording Microphones: USB, XLR & Shotgun Picks 2025”
I can definitely relate to the frustration of spending hours fiddling with microphone settings only to end up with subpar audio. When I first started recording podcasts, I tried using a budget USB mic, thinking I’d save money, but I was disappointed with the muffled and distant sound. It wasn’t until I invested in a decent XLR setup and took the time to learn proper placement that my audio improved significantly. What struck me about the post is the emphasis on environment and technique—those factors are often overlooked but make such a huge difference. I’ve also found that investing in acoustic treatment and a good pop filter can really elevate the quality without breaking the bank. Has anyone here experimented with different room treatments or microphone positions? I’d love to hear what’s worked best for others aiming for that professional yet natural sound.
Reading through this guide really resonated with me, especially about the importance of environment and technique—it’s easy to overlook these details when focusing on gear. In my experience, I started with a decent USB mic, but I kept struggling with room echo and background noise ruining my recordings. It wasn’t until I invested in some basic acoustic treatment like foam panels and a proper mic stand that I noticed a significant improvement. Additionally, I found that experimenting with mic placement—trying different distances and angles—can make a surprisingly big difference in clarity and warmth. Has anyone tried using portable reflection filters or portable sound dampening setups for on-the-go recordings? They might be helpful for those who can’t treat the entire room but still want quality sound. Personally, I think balancing affordable gear with proper room setup is the key to achieving pro-level audio without breaking the bank.
Reading through this detailed guide really opened my eyes about the importance of environment and proper microphone technique, especially for those starting out. I’ve learned the hard way that even the most expensive mic can underperform in a noisy or untreated space. I used to think that upgrading the gear was the only solution, but then I realized that room treatment and mic placement are just as crucial. When I added foam panels and made small adjustments to my microphone position, the jump in sound quality was remarkable. It’s all about experimenting and listening critically, which is something I wish I’d understood earlier.
I’m curious—has anyone here found that certain acoustic treatments or mic accessories make a real difference in their setup? I’ve seen some creators swear by portable reflection filters, but I wonder if they’re worth the investment for casual or on-the-go recording sessions. What strategies have you all used to balance equipment upgrades with room setup? Would love to hear your tips and experiences on creating a professional sound from a simple home studio.
This post hits home for me because I used to overlook room acoustics entirely, thinking that a good mic alone would solve all my issues. When I started paying attention to my environment—adding foam panels and repositioning my mic—I noticed a dramatic improvement in clarity and warmth. It’s fascinating how much of a difference small changes in placement and room setup can make, especially with condensers and shotgun mics. Has anyone experimented with different types of acoustic treatments like bass traps or diffusers? I’ve found that combining these with a quality mic brings a professional touch, even in a home studio. Also, I’m curious about managing background noise in shared spaces; what’s been the most effective solution for others? I believe that the synergy between equipment and environment is the secret to truly professional sound, not just expensive gear alone.
This post really hits close to home, especially about the crucial role environment plays in achieving professional sound. I’ve learned from personal experience that investing in acoustic treatment, like foam panels and bass traps, can make a surprisingly big difference—even in small home studios. When I started paying attention to microphone positioning and room reflections, my recordings became notably clearer and warmer, without needing to upgrade to the most expensive gear. I’m curious, has anyone found that particular types of acoustic treatment have been especially effective for voice work? I’ve been considering adding diffusers to break up sound waves more evenly, but I’d love to hear what’s worked well for others. Also, with so many portable sound dampening accessories available now, do you think they’re a worthwhile investment for creators who record in shared spaces or temporary setups? Would love to hear your tips and experiences on balancing gear upgrades with environmental adjustments to get that professional-quality sound.
This post really highlights how much room environment impacts audio quality, which I’ve learned the hard way myself. Having switched from a simple USB mic to an XLR setup, I also realized that the room acoustics played a major role in achieving clear voice recordings. Turning my closet into a makeshift sound booth with some foam panels and a good mic position made a noticeable difference. It’s tempting to think that better equipment alone will do the trick, but proper placement and room treatment make all the difference. I’ve found that investing in a portable reflection filter helps when I’m recording in shared or temporary spaces. Anyone else tried these setups or found creative ways to improve their environment without huge expenses? It’s fascinating how these small tweaks can elevate the quality so much—it really encourages me to keep optimizing my space and technique.
About Me

Chesung Subba
Author/Writer
Hello, I'm Chesung Subba, a passionate writer who loves sharing ideas, stories, and experiences to inspire, inform, and connect with readers through meaningful content.
Follow Me
Connect with me and be part of my social media community.
Leave a Reply