Why Your 2026 Voiceover Sounds Boxy: 5 XLR Mic Fixes
Ever been in the middle of a voiceover recording and suddenly noticed your audio sounds weirdly boxy—like there’s a tunnel echo or a muffled, unnatural tone? I had that frustrating moment during a client project just last year. I thought my mic was broken, or maybe my room was suddenly acoustically terrible. Turns out, it was a common issue with a simple fix—something I overlooked early on due to my own assumptions about gear and setup. That lightbulb moment made me realize how many creators are battling the same problem without realizing there are straightforward solutions.
Tackle the Boxiness Before It Ruins Your Recordings
The truth is, many voiceover artists and podcasters overlook the core issues that cause their audio to sound dull or hollow. This isn’t about expensive gear alone; it’s about understanding how to optimize your existing setup. Today, I’m promising to share five practical fixes for your XLR microphone that will dramatically improve your sound, making your voice clearer, warmer, and more professional.
Will These Fixes Actually Make a Difference? I Was Skeptical Too
Initially, I thought that replacing my microphone or upgrading my entire recording space was the only way to fix my sound. But I made a mistake early on—spending hundreds on new equipment instead of fine-tuning what I already had. That misstep is common, and I want to help you avoid it. For more insights on how to elevate your voice recordings without breaking the bank, check out this guide on the best XLR microphones for voice clarity in 2025.
Are you tired of recordings that sound like they were done inside a cardboard box? If so, keep reading. Next, we’ll look at simple, effective adjustments you can make today to eliminate that irritating boxy tone and elevate your audio quality to studio standards.
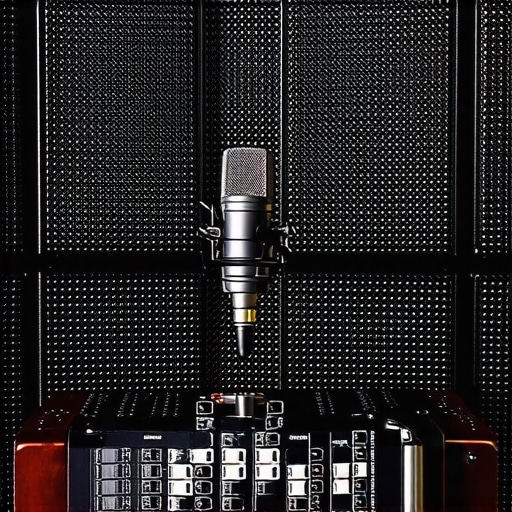
Adjust Your Microphone Placement for Clearer Voice
Start by positioning your microphone correctly. For XLR mics, place the mic about 6-12 inches from your mouth, pointing directly at your lips. Use a flexible mic stand to avoid handling noise. I once struggled with muffled vocals until I moved my mic closer and kept a consistent distance, which instantly brightened my recordings. Proper placement reduces room reflections that cause boxiness.
Apply Acoustic Treatment to Your Recording Space
Next, control room acoustics. Use foam panels, blankets, or a makeshift DIY diffuser behind and around your mic to absorb reflections. I pinned up blankets in my corner, which significantly reduced echo and made my voice sound warmer. This step is crucial—without proper room treatment, even the best mic can sound dull or hollow. For detailed setups, check out voice recording tips.
Use a High-Quality Pop Filter and Windscreen
Incorporate a pop filter to prevent plosive sounds — those hard ‘p’ and ‘b’ sounds that can cause unwanted popping. A foam windscreen helps reduce breath noise and sibilance. I tested different pop filters, and installing one over my XLR mic made a noticeable difference, especially in close-mic positions. These accessories prevent harsh sounds and minimize distortions that contribute to that boxy tone.
Optimize Your Gain Settings and Recording Levels
Set your preamp gain carefully. Too high, and you introduce hiss; too low, and your voice gets faint. Begin with the gain at 50%, then speak at your normal volume to see if the recorded waveform peaks around -12dB to -6dB. I once recorded with gain cranked to max, and the overdrive caused muddiness. Proper gain staging preserves clarity, especially when recording with XLR microphones that require external preamps. For more on this, visit XLR mic setup guide.
Control Room Noise and Use Software Enhancements
Minimize background noise. Turn off fans or air conditioners, and mute electronics that emit hum or buzz. After recording, use noise reduction plugins or software to clean your audio. I once kept my computer humming in the background; applying noise suppression helped my voice stand out without sounding flat or artificial. For better results, explore noise reduction techniques.
 Many creators assume that choosing the right microphone type automatically guarantees professional sound quality, but that’s a misconception that can trip you up. For instance, the popular belief that shotgun microphones are always superior for voice recording ignores the nuances of environment and placement. In reality, a shotgun mic’s effectiveness largely depends on proper positioning and acoustic context, not just its design. Moreover, many overlook that USB mics, while convenient, often lack the dynamic range and control of XLR setups—if you don’t configure gain correctly, you risk muddy or thin audio. This misunderstanding—thinking all USB mics are ‘good enough’—leads to underwhelming results and frustration.
Why does your choice of microphone type matter less than proper technique and environment?
Experts like Ethan Winer emphasize that room treatment and gain staging often have a bigger impact than the mic type itself. Blindly picking a shotgun mic expecting miraculous results without mastering placement or acoustics is a common trap. Similarly, many miss that an XLR mic’s true potential is unlocked only through careful preamp selection and soundproofing, not just hooking it up to any interface. So, next time you’re tempted to chase the latest gear, consider these hidden nuances. Want to dig deeper? Explore how to fix background noise or find the best shotguns for voice clarity with our dedicated guides. Have you ever fallen into this trap? Let me know in the comments.Maintaining your microphone setup is crucial for consistent, high-quality recordings. First, invest in a reliable preamp and audio interface—consider models like the Focusrite Scarlett series or the Universal Audio Apollo Twin, which offer low noise floors and excellent gain control, ensuring your microphone’s performance remains optimal over time. Regularly check and clean your XLR connectors with contact cleaner to prevent oxidation, which can cause signal drops or noise issues. I personally use DeoxIT contact cleaner on my XLR cables and connectors, extending their lifespan and maintaining clear audio paths. Additionally, keep your USB microphones firmware updated; manufacturers release updates that improve compatibility and fix bugs, a step often overlooked but vital for long-term reliability.
Beyond hardware, software maintenance plays a role. Use audio editing tools like Adobe Audition or Reaper with noise gates and spectrum analysis features to monitor your recordings, catching issues before they degrade your output. Scheduled backups of your audio profiles and settings prevent loss of customized configurations after updates or hardware changes.
Looking ahead, the trend toward integrated hardware-software ecosystems will grow, making maintenance even more streamlined and automated. For example, some interfaces now include diagnostics and auto-calibration features, reducing the manual effort involved.
## How do I maintain my recording gear to ensure long-term performance?
One of the most overlooked aspects is environmental control. Keep your recording space at stable temperatures—extreme humidity or heat can damage sensitive components. Use dedicated shelving or cases for your gear to prevent dust buildup, which can clog connectors and deteriorate cables. Regularly inspect your cables and replace any showing signs of wear; worn cables not only degrade sound quality but can also pose safety risks.
For microphone care, avoid exposing your gear to moisture, and store your mics in padded cases when not in use. If you use shotgun microphones outdoors, consider wind protection like Rycote windshields or deadcats, which also serve as long-term protectors against dust and moisture—saving you repair costs down the line. For high-end mics, occasional professional calibration can optimize performance, especially if you’re noticing subtle changes in sound quality. Lastly, maintain a dedicated workspace free from electrical interference—keep your gear away from routers, transformers, or fluorescent lights that can cause hums or buzzes, ensuring your audio remains pristine over time.
3 Hidden Pitfalls That Ensured I Struggled with Boxy Sound Longer Than Necessary
When I first started recording my voiceovers, I thought that investing in the fanciest microphone or the most acoustically treated room would solve all my issues. It wasn’t until I experimented with placement, gain settings, and room treatment that I realized these overlooked details made all the difference. The lightbulb moment? Learning that equipment alone can’t compensate for proper technique and environment. Understanding this early on saved me countless hours of frustration—and a lot of money.
Tools and Tips That Truly Made a Difference in My Voice Recordings
Beyond gear, I’ve curated a set of resources that helped me refine my setup: Ultimate guide to voice recording devices opened my eyes to the importance of choosing the right preamps and interfaces, while best XLR microphones for voice clarity showed me how to match my mic to my environment. Books like “Home Studio Success” inspired me to approach space and soundproofing holistically. Trusting these curated tools helped me elevate my recordings without unnecessary expenses.
Push Beyond the Fear of Making Mistakes and Elevate Your Voice Recordings
Embarking on your audio journey can feel daunting—believe me, I’ve been there. But the truth? The best way to improve is to start experimenting, making small adjustments, and learning from each session. Whether it’s moving your mic a few inches or adjusting your gain, these tweaks can unlock incredible clarity. Remember, no setup is perfect from the start; growth comes from taking action, embracing errors, and pushing your boundaries. You’ve got this—your voice deserves to be heard at its best.
About Me

Chesung Subba
Author/Writer
Hello, I'm Chesung Subba, a passionate writer who loves sharing ideas, stories, and experiences to inspire, inform, and connect with readers through meaningful content.
Follow Me
Connect with me and be part of my social media community.
Leave a Reply