Best Shotgun, USB & XLR Microphones for Voice Recording 2025
I remember the exact moment I realized my audio was sabotaging my content. It was during a live recording session, and suddenly, my voice sounded flat, distant, and unprofessional. No matter how much I tweaked my setup, the clarity just wouldn’t improve. That lightbulb moment hit hard: my microphone wasn’t cutting it. Since then, I’ve dove deep into the world of voice recording equipment, testing countless mics to find the right fit. And let me tell you, choosing the best shotgun, USB, or XLR microphone isn’t just about brand names or price tags — it’s about understanding what actually works for your voice and your environment.
Why Choosing the Right Microphone Matters in 2025
In an era where content creation is more competitive than ever, audio quality can make or break your success. Whether you’re a podcaster, streamer, voice-over artist, or YouTuber, your voice is your brand. According to a study by Adobe, audio quality influences viewer retention by up to 40%. That’s huge. But with so many options—ranging from budget-friendly USB mics to professional XLR setups—how do you know what’s right for you? This is exactly what I aim to clarify today. I’ll share my personal journey, common pitfalls, and the best gear recommendations for 2025, so you don’t waste your time or money.
Is the hype around shotgun, USB & XLR mics actually justified?
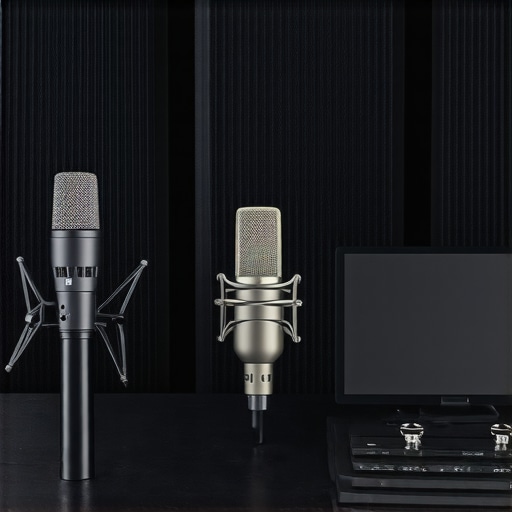
One mistake I made early on was believing that all microphones are created equal. I bought a popular, inexpensive USB mic thinking it would be enough. Spoiler: it wasn’t. The sound was muddy, and I kept fighting background noise. Turns out, understanding the different mic types—shotgun, USB, XLR—is crucial. Shotgun mics, for example, are excellent for capturing focused audio from a distance, while USB mics are perfect for quick setups. XLR mics, on the other hand, often provide superior sound quality but demand more equipment and technical know-how. For a detailed comparison, check out my comprehensive guide on [best USB, XLR, and shotgun microphones for creators in 2025](https://mics.creatorrigreviews.com/best-usb-xlr-shotgun-mics-for-creators-in-2025-ultimate-guide).
As I learned, the key is aligning your microphone choice with your content style, environment, and budget. Ready to ditch the guesswork and level up your voice recording game? Let’s dive into what makes a microphone truly great in 2025 and how you can pick the perfect one for your needs.
Understand Your Environment and Requirements
Before selecting a microphone, evaluate your recording environment. Is it a quiet home studio or a noisy outdoor location? If your space has background noise, a shotgun microphone can be a game-changer due to its focused pickup pattern. For quiet, controlled environments, a good USB mic might suffice. Personally, I once recorded a podcast outdoors, and switching to a shotgun mic improved clarity dramatically, eliminating wind and ambient sounds. Check out voice recording tips for adapting your gear to different settings.
Matching Microphones to Content Type
Step 1: Identify Your Content Style
Are you delivering solo narration, hosting interviews, or capturing a dynamic environment? For voice-over work or podcasts, XLR microphones like the best XLR podcast mics offer superior sound quality and flexibility. For quick streaming setups, a reliable USB microphone like the top USB shotgun mic can be effective. I once upgraded from a generic USB mic to an XLR setup for my podcast, noticing a clear boost in audio richness, which kept listeners engaged.
Step 2: Consider Your Budget
High-end XLR mics with professional preamps can be costly but deliver unmatched quality. Budget-friendly options like affordable USB mics are perfect for beginners. Remember, a good microphone is an investment; pairing it with an audio interface (for XLR) or a quality USB cable can make a big difference. I started with a budget USB mic and later transitioned to XLR, which significantly improved my audio clarity in recordings.
Proper Setup and Placement
The placement of your microphone impacts sound quality more than you might think. For shotgun mics, position the mic directly in line with your mouth, about 6-12 inches away, to get a focused and clear sound. For USB mics, keep the mic at mouth level, slightly off-center to reduce plosives. During a recent recording, I experimented with mic angles and distances, which helped me find the sweet spot for my voice, reducing sibilance and background noise. For detailed setup techniques, see podcast mic setup tips.
Testing and Fine-Tuning
Always record test clips before your main session. Listen critically for clarity, background noise, and tone. Use headphones to monitor your sound in real-time. I once spent hours tweaking my microphone gain and placement, which paid off with a professional-sounding final product. Don’t hesitate to adjust levels and positioning—small changes can have significant impacts. For more testing techniques, consult microphone comparison guides.
Leveraging Accessories for Better Sound
Invest in a pop filter, shock mount, and good quality cables. A pop filter reduces plosive sounds, while a shock mount minimizes vibrations. These accessories help achieve studio-quality recordings even in less-than-ideal environments. I added a pop filter to my shotgun mic setup, which noticeably improved the clarity of my voice recordings. For a comprehensive list of accessories, see microphone accessories guide.
Common misconceptions about microphone choice that can sabotage your audio quality
Many creators fall into the trap of oversimplifying microphone selection, believing that a more expensive mic always guarantees superior sound. While price can correlate with quality, it’s not the sole factor. A common myth is that all XLR mics are better than USB mics. In reality, advanced USB microphones like the top USB shotgun mic can outperform entry-level XLR options for specific environments and needs. The key is understanding your environment, content style, and workflow rather than relying solely on brand reputation or price tags.
Another misconception is that shotgun microphones are only for outdoor use or film sets. In fact, they are incredibly effective for studio setups, especially in noisy environments, due to their focus pattern. However, many overlook the importance of proper placement and environment adaptation, which is critical for achieving optimal results. For instance, positioning a shotgun mic too close or at an incorrect angle can lead to muffled or unnatural sound, regardless of its quality. Check out this guide for advanced placement techniques.
What advanced users often overlook: the impact of acoustic treatment and mic preamps
One hidden nuance is that even the best microphone can be rendered useless without proper acoustic treatment and quality preamps. Many beginners assume that upgrading their mic alone will dramatically improve audio, but neglect the importance of room acoustics and preamp quality. A study by AES (Audio Engineering Society) highlights how room reflections and preamp noise can distort or color your sound, regardless of the mic’s specifications. This is especially true for XLR setups, where investing in a good preamp or audio interface can make a substantial difference.
Furthermore, some creators underestimate the importance of consistent gain staging and proper gain structure, which can lead to clipping or hiss. Advanced techniques include using digital audio workstations (DAWs) to analyze frequency response and eliminate unwanted noise. For detailed insights, explore microphone setup tips.
Have you ever fallen into this trap? Let me know in the comments. The truth is, mastering microphone choice is a nuanced process that combines equipment, environment, and technique. By understanding these hidden details, you’ll elevate your audio quality from amateur to professional in 2025 and beyond.
Once you’ve invested in the perfect microphone, maintaining its performance over time is crucial to ensure consistent, professional-quality audio. The right tools and regular upkeep can extend the lifespan of your equipment and keep your recordings pristine. In this section, I’ll share the specific tools I personally use and recommend for long-term microphone care, as well as some emerging trends that will shape maintenance routines in 2025.
How do I maintain my microphone over time?
Regular cleaning is fundamental. I use a gentle, lint-free cloth to wipe down my mic and accessories after each session, removing dust and fingerprints that can degrade sound quality. For deeper cleaning, I rely on specialized cleaning solutions like isopropyl alcohol wipes, but I always ensure they are applied carefully to avoid damage. Additionally, investing in a sturdy, padded microphone case like the Rycote Microphone Case protects your gear during transport and storage, preventing physical damage and dust accumulation.
Another critical tool is a high-quality pop filter and shock mount. These accessories not only improve sound quality by reducing plosives and vibrations but also help preserve the mic’s integrity over time. I personally find that regularly inspecting and replacing these components prevents long-term wear and tear.
For XLR setups, a reliable audio interface with clean preamps is vital. I recommend models like the Focusrite Scarlett 2i2, which provides stable power and minimal noise, ensuring your microphone remains in optimal condition. Proper gain staging and avoiding clipping are also essential to prevent damage and distortion, so I frequently monitor levels during recording sessions using digital tools.
Looking ahead, I predict that in 2025, smart maintenance tools integrated with AI will become more commonplace. These systems will automatically detect issues like cable faults or preamp degradation and alert users before problems escalate. For now, simple but effective tools like portable audio analyzers, such as the MiniDSP UMM-6, help me monitor frequency response and identify noise issues in real time, ensuring my mic’s performance remains top-notch.
Don’t forget to regularly update your firmware and drivers. Manufacturers often release updates that improve compatibility and fix bugs, which can enhance your mic’s longevity and reliability. Checking the manufacturer’s website monthly for updates is a good habit.
If you want to go the extra mile, consider setting up a dedicated recording environment with acoustic treatment panels and a controlled temperature/humidity environment. This minimizes environmental impact on your gear and preserves its lifespan. For detailed advice on acoustic treatment, see this guide.
To sum up, maintaining your microphone isn’t just about cleaning; it’s about using the right tools, protecting your gear, and staying proactive with updates and environment control. Try implementing these tips today, and your microphone will reward you with consistent, high-quality sound for years to come. Remember, the future of equipment maintenance is heading toward smarter, AI-driven solutions, so stay tuned for innovative tools that will make upkeep even easier.
The Hardest Lesson I Learned About Microphone Choices
One of my biggest realizations was that investing in a high-end microphone alone doesn’t guarantee professional sound. I used to believe that the most expensive XLR mic would automatically elevate my audio. It wasn’t until I understood the importance of environment, placement, and preamp quality that my recordings truly improved. This lightbulb moment taught me that the right gear combined with proper technique creates magic.
3 Myths About Microphones That Held Me Back
Myth #1: All USB microphones are inferior to XLR setups. In reality, some USB mics outperform entry-level XLRs for home studios. Myth #2: Shotgun mics are only for outdoor filming. Actually, indoor use benefits greatly from focused pickup patterns in noisy environments. Myth #3: Microphone brands guarantee quality. Trustworthiness comes from understanding specs, environment, and your specific needs, not just brand names.
What Experts Won’t Tell You About Voice Recording in 2025
Many overlook that acoustic treatment and preamp quality are just as vital as the microphone itself. Even the best mic can sound terrible in a reflective room or with a cheap preamp. Investing in room acoustics and high-quality audio interfaces ensures your voice remains clear and professional. This nuanced approach separates amateur recordings from industry-level quality.
Curated Recommendations for Elevating Your Voice Recording Game
- Focusrite Scarlett 2i2: Trusted for its clean preamps and durability, it’s my go-to audio interface for XLR setups.
- RODE NT-USB: An excellent USB mic with studio-quality sound, perfect for quick setups and beginners.
- PK Power Pop Filter: Essential for reducing plosives and maintaining clarity during recordings.
- Acoustic Treatment Panels: Investing in foam panels transformed my home studio, minimizing echo and background noise.
Your Turn to Try: Take Your Voice to the Next Level in 2025
Now that you understand the nuances of choosing and maintaining the right microphone, it’s your turn to experiment and refine. Remember, mastering voice recording is a journey of continuous learning and adaptation. With the right tools and mindset, your voice can truly shine in 2025 and beyond. Don’t wait — start today and share your progress in the comments below!
4 responses to “Best Shotgun, USB & XLR Microphones for Voice Recording 2025”
This post really resonated with me, especially the emphasis on understanding your environment before selecting a microphone. I used to think that just buying a high-end mic would automatically improve my recordings, but I kept running into issues with background noise and room echo. Since I started investing in acoustic panels and proper mic placement, the difference has been night and day. I also found that a good shock mount and pop filter drastically reduce unwanted noise and plosives, making my recordings sound more professional. Has anyone here experimented with different acoustic treatments or placement techniques that made a noticeable impact? I’d love to hear what has worked for others, especially in small home studio setups where space is limited.
This post hits the nail on the head about environment and proper mic choice being critical for professional recordings. From my own experience, I found that even with a decent mic, the room’s acoustics can totally change the sound quality. I built some DIY acoustic panels using rockwool and foam, and the difference was staggering—suddenly, those pesky echoes and background noise disappeared. It’s also interesting how even simple mic placement tweaks, like angling the mic slightly or adjusting distance, can significantly enhance clarity and reduce sibilance. For those working with limited space, have you tried using furniture or bookshelves as makeshift diffusers? Sometimes, even small touches like that help in creating a controlled recording environment without investing in expensive treatments. I’m curious, what are some unconventional acoustic solutions others have experimented with in home studios? Would love to hear different ideas that can be implemented in tight spaces.
This article really hits home about the importance of environment and proper mic selection for professional sound quality. I’ve personally found that investing in some basic acoustic panels and experimenting with mic placement made a world of difference in my small home studio. It’s tempting to focus solely on gear, but as the post mentions, the room and setup are just as crucial. I’ve also noticed that even simple adjustments, like angling the mic slightly or adding a reflection filter, improved clarity significantly. For those working in limited spaces, what are some effective DIY solutions you’ve tried to optimize your acoustics? I’d love to hear ideas beyond the typical foam panels—maybe creative furniture arrangements or makeshift diffusers that have worked well in tight quarters.
I completely relate to the point about environment impacting audio quality. When I first started, I thought a good microphone was enough, but I quickly learned that acoustic treatment and placement make a huge difference. I’ve experimented with hanging thick blankets and using bookshelves as makeshift diffusers in my small home setup, and the clarity definitely improved. It’s interesting how even simple DIY solutions can mimic professional treatments and save a lot of money. Has anyone tried adding in some household items like rugs or curtains strategically? I wonder if combining those with professional panels could give a more balanced sound. What are some unconventional yet effective ways others have improved their acoustics without breaking the bank? Would love to hear different approaches especially in tight spaces!
About Me

Chesung Subba
Author/Writer
Hello, I'm Chesung Subba, a passionate writer who loves sharing ideas, stories, and experiences to inspire, inform, and connect with readers through meaningful content.
Follow Me
Connect with me and be part of my social media community.
Leave a Reply